Applying Tags to Content in Regie
Ensure your team has access to the right materials by applying Tags to your Campaigns and Content within Regie.
Dindo Fernandez
Last Update 2 years ago
Leveraging Tags in Regie will enable you and your team to quickly filter and find the content and assets you are creating or uploading to the platform for them to use.
As an Admin or Creator/or Creator Publisher in Regie, you can easily add your custom tags to content at any time. All Tagged content is accessible to you or your team via Filters accessible across the platform, including the Regie.Ai Chrome Extension, making locating important assets a breeze!
Note: Lists and their accompanying Tags must be created in Regie before they can be applied to your content. If you haven't added Lists or Tags to your Regie Workspace, please see Creating Lists and Tags before proceeding.
Adding Tags to Content in Regie
Add tags to call scripts, blog posts, or any custom document created or uploaded to Regie:
1. Within the Editing screen of the document, locate the Add Tags button located on the upper right side of the page.

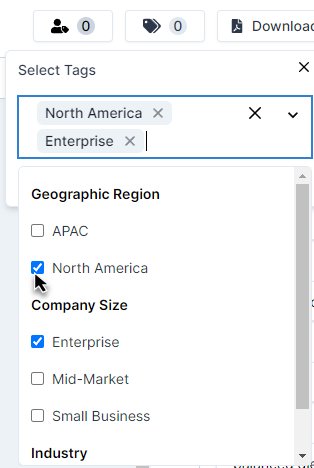
2. A Select Tags drop down menu will appear for you to select the tags to add to the document. Simply click the open box next to the name of the Tag, which will change to blue and show a white checkmark, indicating it is selected.

Multiple tags can be selected if needed and your selected tag(s) will be visible in the box at the top.
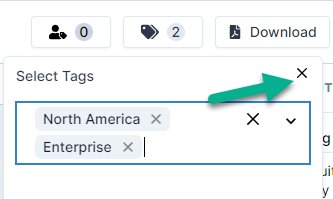
3. Click the X button within the Select Tags drop down menu, to exit. This action also automatically saves the tags to your document.

4. That's it! You'll see the total number of tags associated with the document next to the Add Tags icon at the top of the page.
Using the image above as an example, there are two tags applied to this piece of content.

Re-visiting the "Add Tags" button will also provide the opportunity for a Regie Admin or Creator/Creator Publisher to remove or select additional tags as needed.
Please see How to Filter Your Content Library for training on how using tags helps you quickly find content in Regie.
Adding Tags to a Campaign
1. From the left side navigation menu, expand the Co-Pilot section and select Sequences.

2. In the Sequences Overview page, select the open box next to the Campaign you want to apply tags to.

3. After Campaign is selected, the Sequence Action Menu on the top of the page will change from grey to blue and become clickable.
Select the Manage Tags button .

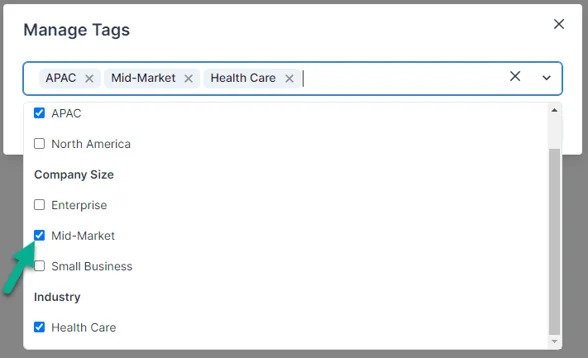
4. A Manage Tags window will appear for you to select the tags to add to the Campaign from the drop down menu of available tags. Simply click the open box next to the name of the Tag, which will change to blue with a white checkmark, indicating it is selected.

5. Multiple tags can be selected if needed and your selected tag(s) will be visible in the box at the top in bubbles.
6. Once finished, press Save to apply the tags to the Campaign.

7. And it's as simple as that!
Re-visiting the "Manage Tags" button for any selected Campaign will provide the opportunity for a Regie Admin or Creator/Creator Publisher to remove or select additional tags as needed.
Please see How to Filter Your Campaign Library for training on using tags to easily locate Campaign content in Regie.

